Introduction
Concept:Marine Park
Context of the Concept
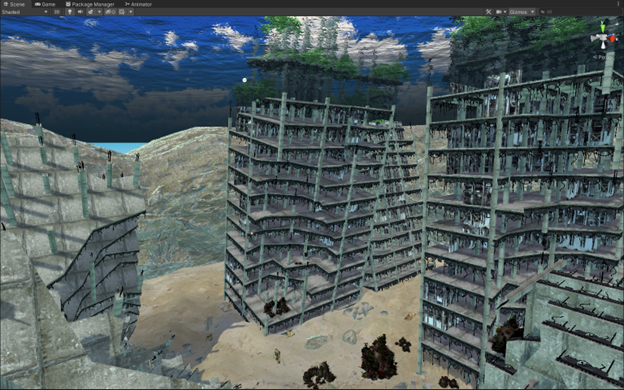
The idea of constructing this underwater world came from an animation I watched when I was a child, called Future Boy Conan, which tells the story of the protagonist and his grandfather living on an island after more than half of the earth's land was destroyed in a war. In the early stages of the story, the underwater ruins are impressive, this scenario may be as anti-war propaganda, perhaps can make people recall childhood memories, or can be as simple as an experience of visiting ruins in the underwater world, after all, visiting underwater ruins is almost impossible in the real world.
Key requirements of the concept
This concept can be mainly divided into two parts. One is the environment, which includes ruins, uneven seabed, sea creatures, water surface and environment rendering, etc. The other is interactive content, which is mainly player-related functions. In terms of building the environment, I checked some underwater scenes in the Future Boy Conan. I recreated the scene on a small scale using the assets I could easily; For player characters, I used the XR Interaction Toolkit as the support of the VR platform and implemented different functions through a series of codes.
Why the application should be considered to be a virtual reality experience?
The game has to be played using a VR headset, combined with the content of the application, it's a clearly virtual reality experience.
Required functionalities:
Continuous Movement
To enable Continuous movement, I created a script called the Continuous Motion System, which reads the orientation of the player's headset and moves the player in that direction. When the player is on the surface (ground layer), the player can only move on the X-axis, and when the player is underwater, the player can move on both the X-axis and the Y-axis.
private void CapsuleFollowHeadset()
{
    height = origin.CameraInOriginSpaceHeight + addtionalHeight;
    Vector3 capsuleCenter = transform.InverseTransformPoint(origin.Camera.transform.position);
    center = newVector3(capsuleCenter.x, character.height / 2 + character.skinWidth, capsuleCenter.z);
}
private void ContinousMove()
{
    CapsuleFollowHeadset();
    Quaternion headYaw;
    if(state.isUnderWater(-1.0f))
    {
        headYaw = Quaternion.Euler(origin.Camera.transform.eulerAngles.x, origin.Camera.transform.eulerAngles.y, 0);
    }
    else
    {
        headYaw = Quaternion.Euler(0, origin.Camera.transform.eulerAngles.y, 0);
    }
    Vector3 direction = headYaw * newVector3(primary2DAxisValueLeft.x, 0, primary2DAxisValueLeft.y);
    Move(direction * Time.deltaTime * moveSpeed);
}
///Swim
private void SwimUp()
{
    if(primart2DAxisButton && state.isUnderWater(-1.0f))
    {
        Move(Vector3.up * Time.deltaTime * moveSpeed);
    }
}
Continuous Turn and Snap Turn
The logic of Continuous Turn is very similar to the Continuous Motion System script, but the Transform.Rotate method is called for rotation.
private void ContinousTurn()
{
    this.transform.Rotate(0, primary2DAxisValueRight.x * rotateSpeed * Time.deltaTime, 0);
}
Continuous Turn often makes the player dizzy or uncomfortable, so most games use Snap Turn as a method of rotating the player’s character. Continuous Turn is automatically disabled when Snap Turn is enabled. By default, Snap Turn rotates 40 degrees to the left or right based on the Y Axis of the player's Primary 2D Axis of the controller, but this value can also be adjusted in the control panel.
Unlike Continuous Turn, Snap Turn does not need continuous rotation. Therefore, I set an interval for Snap Turn. Players must pass this interval before they can rotate again.
void Start()
{
    //Initialize timer
    snapInterval = timer;
}
void Update()
{
    //Read controller primary axis input
    InputDevice device = InputDevices.GetDeviceAtXRNode(inputSource);
    TryGetFeatureValue(CommonUsages.primary2DAxis, outinputAxis);
    if(snapTurn)
    {
        if(inputAxis.x > 0.7)
        {
            SnapSpinning(turnAngle);
        }
        if(inputAxis.x < -0.7)
        {
            SnapSpinning(-turnAngle);
        }
    }
    //Qucik Turn: Turn 180 degress at once.
    if(enableQuickTurns && inputAxis.y < -0.7 && inputAxis.x < 0.7 && inputAxis.x > -0.7)
    {
        SnapSpinning(-180);
    }
    //Use a timer to keep the character from spinning
    snapInterval -= Time.deltaTime;
    if(snapInterval <= 0)
    {
        snapTurn = true;
    }
}
private void SnapSpinning(float angle)
{
    this.transform.Rotate(newVector3(0, angle, 0));
    snapTurn = false;
    snapInterval = timer;
}
///Allow user to set Snap Turn Angle with silder on the control panel
public void setTurnAngle(float value)
{
    turnAngle = value;
}
State Machine
The PlayerState script is used to get player state in Realtime. There are two states for player, if the player is on the ground and if the player is underwater, the gravity coefficient in the game, whether to render exponential fog and some motion parameters are affected by these states.
public bool isUnderWater(float offset)
{
    return this.transform.position.y – waterPlane.position.y < offset;
}
public bool isOnGround()
{
    Vector3 start = this.transform.TransformPoint(character.center);
    float length = character.center.y + 0.01f;
    returnSphereCast(start, character.radius, Vector3.down, outRaycastHit info, length, groundLayer);
}
The tool used to interact with the environment is a simple teleportation tool. When the player has enabled the teleportation function and pressed the Trigger of the right controller, a laser will appear from the hand model. If the end of the laser collides with the plane that can be used as a teleportation target, the position of the point where the laser collides will be returned, and the laser will be displayed in green, otherwise it will be displayed in red; After getting the position of this point, if the player releases the Trigger key (when the trigger value is less than 0.3), it is deemed that the player wants to teleport. At this time, the player’s CharacterController will be temporarily disabled and then teleport. After the teleportation is completed, the character Controller will be reactivated.
private void Start()
{
    positionCount = laserSteps;
}
void Update()
{
    if(triggerValue > 0.8f)
    {
        TryToGetTeleportTarget();
    }
    else if(targetAcquired && triggerValue < 0.3f)
    {
        Teleport();
    }
    else if(!targetAcquired && triggerValue < 0.3f)
    {
        ResetLaser();
    }
}
private void TryToGetTeleportTarget()
{
    targetAcquired = false;
    Vector3 origin = transform.position;
    SetPosition(0, origin);
    for(int i = 0; i < laserSteps-1; i++)
    {
        Vector3 offset = (transform.forward + (Vector3.down * dropPerSegment * i)).normalized * laserSegmentDistance;
        if(Physics.Raycast(origin, offset, out RaycastHit hit, laserSegmentDistance))
        {
            for(intj = i+1; j < laser.positionCount; j++)
            {
                laser.SetPosition(j, hit.point);
            }
            if(hit.transform.gameObject.layer == LayerMask.NameToLayer(teleprotationLayerName))
            {
                startColor = Color.green;
                endColor = Color.green;
                targetPos = hit.point;
                targetAcquired = true;
                return;
            }
            else
            {
                startColor = Color.red;
                endColor = Color.red;
                return;
            }
        }
        else
        {
            SetPosition(i + 1, origin + offset);
            origin += offset;
        }
    }
    startColor = Color.red;
    endColor = Color.red;
}
private void Teleport()
{
    enabled = false;
    targetAcquired = false;
    ResetLaser();
    Vector3 offset = newVector3(targetPos.x – head.transform.position.x, targetPos.y – origin.position.y, targetPos.z – head.transform.position.z);
    position += offset;
    enabled = true;
}
private void ResetLaser()
{
    for(int i = 0; i < laser.positionCount; i++)
    {
        SetPosition(i, Vector3.zero);
    }
}
After the teleportation, the position of laser will be set as Vector3. Zero, that is, a vector with a length of 0. At this time, the laser is shown as hidden.
Visual and auditory cues
To create the underwater atmosphere, I also used exponential fog, which only renders when the player is underwater.
private evoid FixedUpdate()
{
    if(state.isUnderWater(-1.2f))
    {
        fog = true;
    }
    else
    {
        fog = false;
    }
}
Parameters can be assessable via a user interface provided to the user
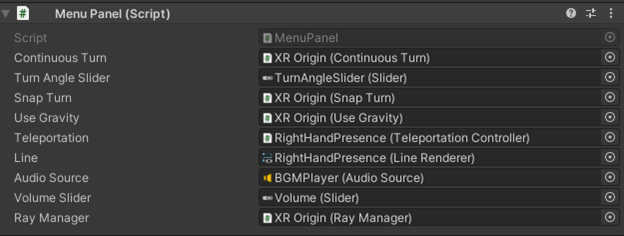
At any time, the player can call out the Settings panel through the Primary Button of the controller. The panel contains some parameters of the player control system and environment, such as the rotation Angle of a single Snap Turn, enable or disable gravity, enabled or disable teleportation function and play or mute BGM, etc.
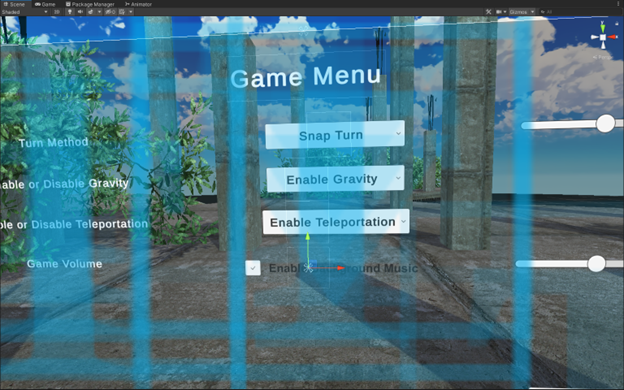
When the panel is opened, functions such as movement and teleportation will be disabled. A Laser for manipulating the panel will be enabled. This code is controlled by the MenuPanel script.
public void SetTypeOfTurn(int index)
{
    if(index == 0)
    {
        enabled = false;
        enabled = true;
        //turnAngleSlider.enabled = true;
        gameObject.SetActive(true);
    }
    if(index == 1)
    {
        enabled = false;
        enabled = true;
        //turnAngleSlider.enabled = false;
        gameObject.SetActive(false);
    }
}
public void EnableGravity(int index)
{
    if(index == 0)
    {
        enabled = true;
    }
    if(index == 1)
    {
        enabled = false;
    }
}
public void EnableTeleportation(int index)
{
    if(index == 0)
    {
        enabled = true;
        enabled = true;
        teleportationState = true;
    }
    if(index == 1)
    {
        enabled = false;
        enabled = false;
        teleportationState = false;
    }
}
public void ChangeVolume(float value)
{
    volume = value;
}
public void EnableVolumeSlider(bool value)
{
    enabled = value;
    mute = !audioSource.mute;
}
Autonomous simulation
A fixed number of fish are generated in the game, each generated by a specific Spawner which sets a random initial spawned position for the fish and defines the fish’s movement range.
void Start()
{
    float height = waterPlane.position.y – 2.0f;
    goalPos = this.transform.position;
    Vector3 anchorPos = this.gameObject.transform.position;
    for (int i = 0; i < allFish.Length; i++)
    {
        int index = Random.Range(0, fishTypeNum);
        GameObject fish = fishPrefabs[index];
        Vector3 pos = newVector3(
        Range(-swimRange.x + anchorPos.x, swimRange.x + anchorPos.x),Random.Range(0, height),
        Range(-swimRange.z + anchorPos.z, swimRange.z + anchorPos.z));
        allFish[i] = (GameObject)Instantiate(fish, pos, Quaternion.identity);
        allFish[i].GetComponent<FishFlock>().spawnerManager = this;
    }
}
void Update()
{
    if(Random.Range(0, 10000) < 50)
    {
        //Generate random position
        goalPos = this.transform.position +
        newVector3(Random.Range(-swimRange.x, swimRange.x),Random.Range(-swimRange.y, swimRange.y),Random.Range(-swimRange.z, swimRange.z));
        //goalPrefab.transform.position = goalPos;
    }
}
Fish behavior is controlled by another script, the FishFlock. Flocking is an algorithm used to simulate the clustering behavior of animals in the real world. Through this algorithm, when multiple fish are less than a specific distance away, they are set to be in the same group and perform the same moving behavior. Through a random number method, each fish has a certain chance to escape the control of the algorithm for a short time, at which point the fish will leave the cluster until it is controlled by the algorithm again and comes close to other fish to form the group again.
void Update()
{
    Bounds bounds = new Bounds(spawnerManager.transform.position, spawnerManager.swimRange * 2);
    if (!bounds.Contains(transform.position))
    {
        turning = true;
    }
    else
    {
        turning = false;
    }
    if(turning)
    {
        //Let fish back to the center of the tank.
        Vector3 direction = spawnerManager.transform.position – transform.position;
        //Vector3 direction = newGoalPos – transform.position;
        rotation = Quaternion.Slerp(transform.rotation, Quaternion.LookRotation(direction), rotationSpeed * Time.deltaTime);
        speed = Random.Range(minSpeed, maxSpeed);
    }
    else
    {
        if(Random.Range(0, 5) < 1)
        {
            ApplyFishBehaviours();
        }
    }
    Translate(0, 0, speed * Time.deltaTime);
}
private void ApplyFishBehaviours()
{
    GameObject[] gos;
    gos = spawnerManager.allFish;
    //Center of the group
    Vector3 vCenter = Vector3.zero;
    //Avoidance vector: Avoid fish from crashing each other
    Vector3 vAvoid = Vector3.zero;
    //Group speed
    float gSpeed = 0.1f;
    //Random position
    Vector3 goalPos = spawnerManager.goalPos;
    float distance;
    intgroupSize = 0;
    foreach(GameObject item in gos)
    {
        if(item != this.gameObject)
        {
            //Calculate the distance between the current fish to all the other fish.
            distance = Vector3.Distance(item.transform.position, this.transform.position);
            //Form a group with other fishes whose in the range of “neighbourDistance”
            if(distance <= neighbourDistance)
            {
                vCenter += item.transform.position;
                groupSize++;
                if(distance < 2.0f)
                {
                    vAvoid = vAvoid + (this.transform.position – item.transform.position);
                }
                FishFlock anotherFlock = item.GetComponent<FishFlock>();
                gSpeed = gSpeed + anotherFlock.speed;
            }
        }
    }
    if(groupSize > 0)
    {
        vCenter = vCenter / groupSize + (goalPos – this.transform.position);
        speed = gSpeed / groupSize;
        Vector3 direction = (vCenter + vAvoid) – transform.position;
        if(direction != Vector3.zero)
        {
            rotation = Quaternion.Slerp(transform.rotation, Quaternion.LookRotation(direction), rotationSpeed * Time.deltaTime);
        }
    }
}
Start screen
The game consists of two scenes: Game Scene, and Menu Scene. The Menu Scene is the start scene which consists of a simple environment and an interactive panel. The interactive panel includes a Start button – click to move player to Game Scene; Button Usage – describes the basic operation method; A Quit button, when clicked, terminates the program; In the lower right corner of the panel is the developer information for the game.
Operational instructions
How to install and run the code.
The game will be packaged as a compressed file. Players can start playing by double clicking the executable file after unzipping.
The game program runs on the PC Windows side, but VR headset is necessary for game play.
Instructions on controller operations
|
Left controller |
Right controller |
| Move |
2D Axis |
- |
| Rotation(perspective) |
- |
2D Axis |
| Swim Up |
- |
2D Axis (Pressed) |
| Call out the control panel |
X Button |
A Button |
| Teleportation |
- |
Trigger |
Asset list
AQUAS Lite – Built-In Render Pipeline, Dogmatic, https://assetstore.unity.com/packages/vfx/shaders/aquas-lite-built-in-render-pipeline-53519
Colorful Sea-Fish Pack, Sou Chen Ki, https://assetstore.unity.com/packages/3d/characters/animals/fish/colorful-sea-fish-pack-12389
Destroyed City FREE, Profi Developers, https://assetstore.unity.com/packages/3d/environments/sci-fi/destroyed-city-free-6459
Free Stylized Skybox, Yuki2022, https://assetstore.unity.com/packages/2d/textures-materials/sky/free-stylized-skybox-212257
Rusty Cars, Duane’s Mind, https://assetstore.unity.com/packages/3d/vehicles/rusty-cars-3437
Ambient Video Game Music – Underwater Worlds, Phat Phrog Studios, https://assetstore.unity.com/packages/audio/ambient/nature/ambient-video-game-music-underwater-worlds-220371
Aquarium – Shoal AI, Blackant Master Studio, https://assetstore.unity.com/packages/tools/ai/aquarium-shoal-ai-176475
References
Al for developers, Chapter 4. Flocking, Glenn.S & David.M.B, O’REILLY, https://www.oreilly.com/library/view/ai-for-game/0596005555/ch04.html
Coding Challenge #124: Flocking Simulation, The Coding Train, YouTube, < https://www.youtube.com/watch?v=mhjuuHl6qHM>
Showcase Video


Introduction
Concept:Marine Park
Context of the Concept
The idea of constructing this underwater world came from an animation I watched when I was a child, called Future Boy Conan, which tells the story of the protagonist and his grandfather living on an island after more than half of the earth's land was destroyed in a war. In the early stages of the story, the underwater ruins are impressive, this scenario may be as anti-war propaganda, perhaps can make people recall childhood memories, or can be as simple as an experience of visiting ruins in the underwater world, after all, visiting underwater ruins is almost impossible in the real world.
Key requirements of the concept
This concept can be mainly divided into two parts. One is the environment, which includes ruins, uneven seabed, sea creatures, water surface and environment rendering, etc. The other is interactive content, which is mainly player-related functions. In terms of building the environment, I checked some underwater scenes in the Future Boy Conan. I recreated the scene on a small scale using the assets I could easily; For player characters, I used the XR Interaction Toolkit as the support of the VR platform and implemented different functions through a series of codes.
Why the application should be considered to be a virtual reality experience?
The game has to be played using a VR headset, combined with the content of the application, it's a clearly virtual reality experience.
Required functionalities:
Various form of control
Continuous Movement
To enable Continuous movement, I created a script called the Continuous Motion System, which reads the orientation of the player's headset and moves the player in that direction. When the player is on the surface (ground layer), the player can only move on the X-axis, and when the player is underwater, the player can move on both the X-axis and the Y-axis.
Continuous Turn and Snap Turn
The logic of Continuous Turn is very similar to the Continuous Motion System script, but the Transform.Rotate method is called for rotation.
Continuous Turn often makes the player dizzy or uncomfortable, so most games use Snap Turn as a method of rotating the player’s character. Continuous Turn is automatically disabled when Snap Turn is enabled. By default, Snap Turn rotates 40 degrees to the left or right based on the Y Axis of the player's Primary 2D Axis of the controller, but this value can also be adjusted in the control panel.
Unlike Continuous Turn, Snap Turn does not need continuous rotation. Therefore, I set an interval for Snap Turn. Players must pass this interval before they can rotate again.
State Machine
The PlayerState script is used to get player state in Realtime. There are two states for player, if the player is on the ground and if the player is underwater, the gravity coefficient in the game, whether to render exponential fog and some motion parameters are affected by these states.
Tool to interact with environment
The tool used to interact with the environment is a simple teleportation tool. When the player has enabled the teleportation function and pressed the Trigger of the right controller, a laser will appear from the hand model. If the end of the laser collides with the plane that can be used as a teleportation target, the position of the point where the laser collides will be returned, and the laser will be displayed in green, otherwise it will be displayed in red; After getting the position of this point, if the player releases the Trigger key (when the trigger value is less than 0.3), it is deemed that the player wants to teleport. At this time, the player’s CharacterController will be temporarily disabled and then teleport. After the teleportation is completed, the character Controller will be reactivated.
After the teleportation, the position of laser will be set as Vector3. Zero, that is, a vector with a length of 0. At this time, the laser is shown as hidden.
Visual and auditory cues
To create the underwater atmosphere, I also used exponential fog, which only renders when the player is underwater.
Parameters can be assessable via a user interface provided to the user
At any time, the player can call out the Settings panel through the Primary Button of the controller. The panel contains some parameters of the player control system and environment, such as the rotation Angle of a single Snap Turn, enable or disable gravity, enabled or disable teleportation function and play or mute BGM, etc.
When the panel is opened, functions such as movement and teleportation will be disabled. A Laser for manipulating the panel will be enabled. This code is controlled by the MenuPanel script.
Autonomous simulation
A fixed number of fish are generated in the game, each generated by a specific Spawner which sets a random initial spawned position for the fish and defines the fish’s movement range.
Fish behavior is controlled by another script, the FishFlock. Flocking is an algorithm used to simulate the clustering behavior of animals in the real world. Through this algorithm, when multiple fish are less than a specific distance away, they are set to be in the same group and perform the same moving behavior. Through a random number method, each fish has a certain chance to escape the control of the algorithm for a short time, at which point the fish will leave the cluster until it is controlled by the algorithm again and comes close to other fish to form the group again.
Start screen
The game consists of two scenes: Game Scene, and Menu Scene. The Menu Scene is the start scene which consists of a simple environment and an interactive panel. The interactive panel includes a Start button – click to move player to Game Scene; Button Usage – describes the basic operation method; A Quit button, when clicked, terminates the program; In the lower right corner of the panel is the developer information for the game.
Operational instructions
How to install and run the code.
The game will be packaged as a compressed file. Players can start playing by double clicking the executable file after unzipping.
The game program runs on the PC Windows side, but VR headset is necessary for game play.
Instructions on controller operations
Asset list
AQUAS Lite – Built-In Render Pipeline, Dogmatic, https://assetstore.unity.com/packages/vfx/shaders/aquas-lite-built-in-render-pipeline-53519
Colorful Sea-Fish Pack, Sou Chen Ki, https://assetstore.unity.com/packages/3d/characters/animals/fish/colorful-sea-fish-pack-12389
Destroyed City FREE, Profi Developers, https://assetstore.unity.com/packages/3d/environments/sci-fi/destroyed-city-free-6459
Free Stylized Skybox, Yuki2022, https://assetstore.unity.com/packages/2d/textures-materials/sky/free-stylized-skybox-212257
Rusty Cars, Duane’s Mind, https://assetstore.unity.com/packages/3d/vehicles/rusty-cars-3437
Ambient Video Game Music – Underwater Worlds, Phat Phrog Studios, https://assetstore.unity.com/packages/audio/ambient/nature/ambient-video-game-music-underwater-worlds-220371
Aquarium – Shoal AI, Blackant Master Studio, https://assetstore.unity.com/packages/tools/ai/aquarium-shoal-ai-176475
References
Al for developers, Chapter 4. Flocking, Glenn.S & David.M.B, O’REILLY, https://www.oreilly.com/library/view/ai-for-game/0596005555/ch04.html
Coding Challenge #124: Flocking Simulation, The Coding Train, YouTube, < https://www.youtube.com/watch?v=mhjuuHl6qHM>
Showcase Video
Read Next
MySQL/Redis相关面试题
数据库运维(MySQL和Redis)的面试题总结
事件源模式和传统数据库方法在数据管理上的优劣分析
对事件源模式和传统数据库方法在应用程序性能影响、性能、扩展性和可靠性的分析;以及云原生环境下数据管理的最佳实践
关于Metrics_server在自托管环境下无法使用的问题
修复kubernetes的metrics server在自托管环境下因缺少CA证书而无法运行的问题。
关于IP、子网掩码、主机位和网络位的计算方法
如何通过子网掩码和掩码位计算一个IP地址的网络地址和可分配的主机位